If you just got here, hit the button and go get the app!
You'll also need a way to mount your phone onto your legacy film camera. Here is an example but you can do it any way you want as long as it's parallel to the film plane.
See further instructions below:
See further instructions below:
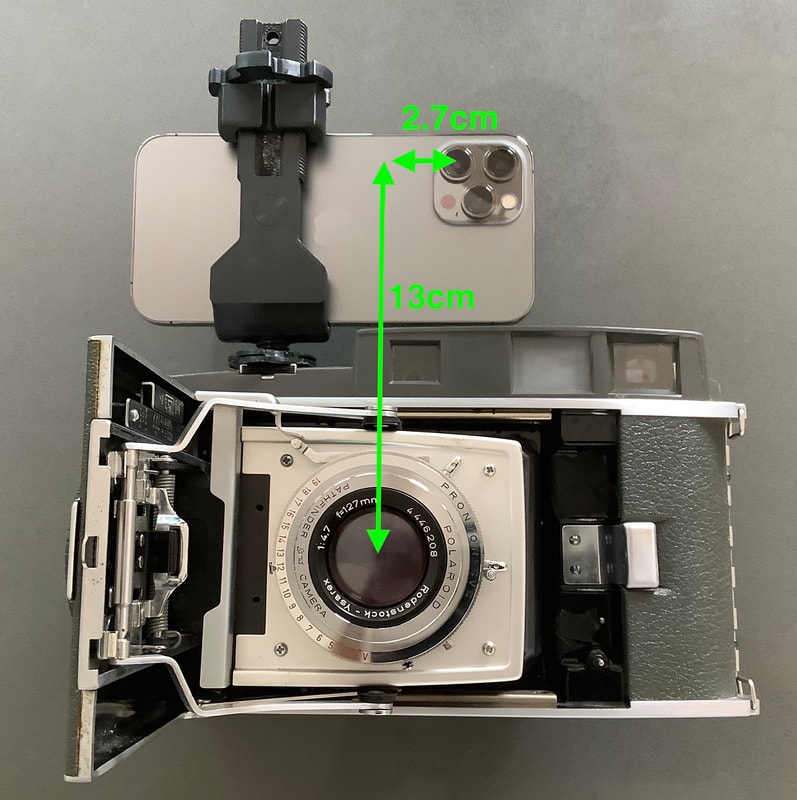
Image Junky App Instructions:
Choose viewing mode mode by tapping the switches on the top left and right of the main screen.
-Rangefinder Mode: In this mode users of legacy film cameras who enter their offset parameters get an accurate parallax corrected viewfinder! Tap any spot in frame for distance info using the iPhone LiDar camera. The frame will also be corrected for parallax error using that distance reading. Due to hardware limitations of the iPhone LiDAR, "Ultra wide" iPhone lens is disabled in this mode. A grey buffer will be shown around the image if it is too wide in order to help you compose a frame with very wide FOV.
-Director’s Finder Mode: An accurate viewfinder that allows your iPhone to reproduce the field of view of any lens based on sensor dimensions that you enter. No parallax correction in this mode. "Ultra wide" iPhone lens enabled.
Zoom/Prime Modes: In “prime” mode “+” and “-“ buttons will appear so you can step thorough the lenses on your list. Turn off prime mode to free zoom with slider. Activating prime mode will snap the focal length to the nearest prime in your set. Free zoom is limited to 12mm to 200mm focal lengths but you can add any focal length to a lens set and access them in “prime” mode.
Capture Button: Saves your frame with lens and camera name information included to your iPhone's camera roll.
To Enter Custom Camera: Tap camera name on top left of main screen to enter camera menu. Tap “+”, create a camera name and enter the manufacturer’s sensor (or film back) size data in millimeters for the image you want to view. You can create custom sensor sizes for a stabilization pad or unique aspect ratios here. If you are not using the parallax correction feature, leave all offset values at zero. Swipe left to edit or delete any camera.
To Enter Custom Lens Set: Tap lens set name on top right to enter lens menu. Tap “+”, create a name and add your focal lengths separated by commas in the lens list box. These will be the lenses chosen in “Prime Mode”. Swipe left to edit or delete any lens set.
-Anamorphic Lenses: In camera setup multiply the vertical sensor dimension by your chosen aspect ratio to simulate anamorphic cameras. For example, when shooting a 2.35 aspect ratio with a 17.7mm vertical sensor dimension, use a 41.6mm horizontal dimension and your lens field of view will be accurate.
-Parallax Corrected Viewfinder:
1. Hard mount the iPhone to your legacy film camera (or other imaging creation tool) with the phone's lens as close as practical to the main camera’s “taking” lens and picture plane.
2. Use a ruler to measure the horizontal and vertical distance between the iPhone’s medium lens and the center of the taking lens in centimeters. If the taking lens is below the iPhone, the vertical input will be a negative value. When viewed from the back, an offset distance to the right of the film camera’s lens is a positive value and to the left is a negative value. For the “Z” value, measure the distance from the film camera lens’s entrance pulpil and the iPhone lens. A rule of thumb puts that point at the front element of the taking lens but you’ll have to test if you need it dead accurate. A typical set of values for an iPhone mounted with its lens above and to the right of a common 50mm prime lens might be: “Vertical: -9cm, Horizontal: 6.5cm, “Z”: 10cm”. You may need to adjust these values a bit to account for errors in your mount system or other inconsistencies in the setup but you'll be close.
3. To activate the image correction, tap any spot in the frame. Live distance display can be used to set focus up to 5 meters. For long bellows cameras you may have to create a separate "camera" in the list that has a larger “Z” value for close focus situations. If extra accuracy is needed set up your camera with a ground glass at the image plane and adjust the offsets in the app until you get a good match. For close in portrait work this really helps. The more rigid and accurate the iPhone mount the better of course.
“Image Junky” offers some 3d printed iPhone mounts to help get you started. Email [email protected] to order! Also email with feedback and we’ll do our best to answer any questions and take user suggestions for updates.
Thanks for being a part of this project and I hope it makes cinematography and photography even more fun.
-Alex Vendler